Hello friends!! Today I’m participating in Pretty Pink Posh’s October Release Blog Hop!! This is such a fun holiday release!! I loved designing with these products, so much so I have 5 cards to share with you today!!
First up are some cards I created with Joy Stamp Set and Joy Coordinating Dies!

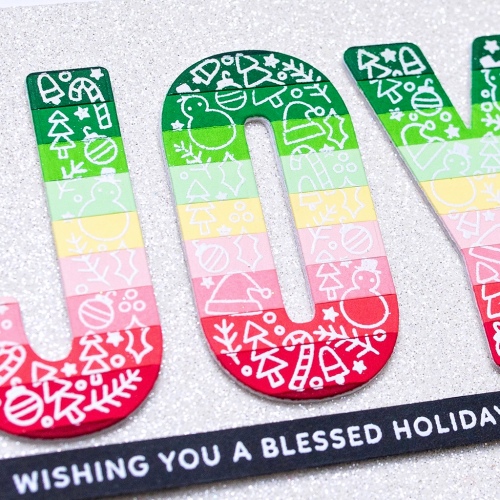
First, I trimmed 11 different scraps of colored cardstock down to 0.25″ strips. I then adhered the strips together onto an A2 panel and capped off the ends of the panel with two 0.75″ strips of white cardstock.

Next, I stamped and white heat embossed “JOY” onto the panel and then diecut it out with the coordinating dies.
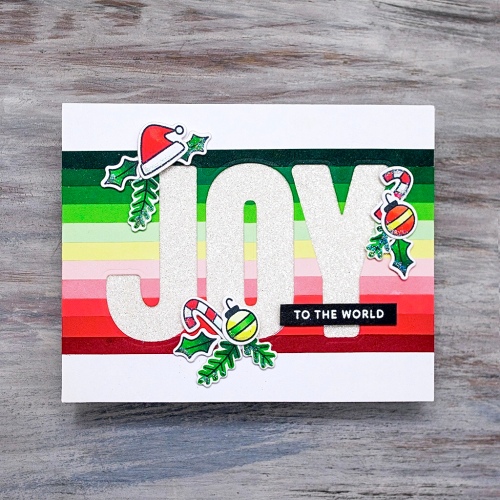
I then stamped and copic colored several images from the Joy Stamp Set. Once I finished coloring the images, I then diecut them out with the coordinating dies. Next, I stamped and white heat embossed both sentiments from the Joy Stamp Set on black cardstock and then trimmed the sentiments down to a strip. I then adhered panels (3.875″ x 5.125″) of white glittery cardstock down onto two A2 card bases. I then diecut the “JOY” 3 more times and then adhered them and the striped/embossed “JOY” together.
I then finished my first card by adhering the JOY and the sentiment strip, popped up on foam tape, onto the card front.

I then finished the second card by first adhering the striped panel onto over the glittery panel on the 2nd card front. Next, I adhered the sentiment strip and all the images with foam tape. Lastly I added a little sparkle to the images with glitter and glue.
Next is a fun interactive card featuring the Happy Hanukkah Stamp Set and coordinating die.

First I ink blended over a white panel slightly smaller than an A2 panel with the Snowflakes Stencil and Tumbled Glass Distress Ink. I then stamped and silver embossed the sentiment onto the panel. Next, I stamped and silver embossed the menorah. I then copic colored the menorah.

Next, I diecut the flames out of the front panel. I then traced the outline of the flames onto a small rectangle (1″ X 2.5″) of white cardstock and then colored them in with copics. I then inlaid this rectangle into an A2 panel of blue cardstock.

Next, I diecut a pull tab out of white cardstock and then ink blended on it with the Snowflakes Stencil. I then constructed the channel for my pull tab with craft foam onto the blue panel.
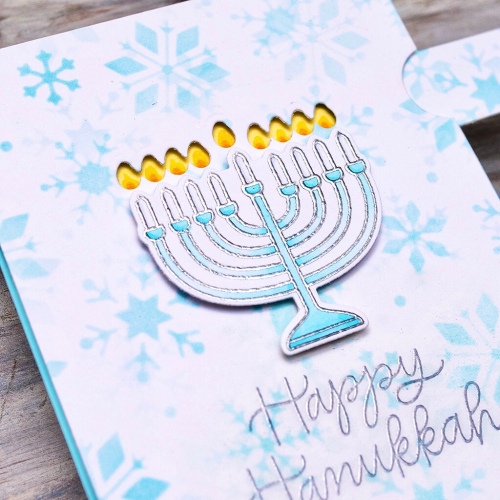
Next, I diecut a half-circle with a circle die from the front panel. I then popped in the pull tab and then sealed the card shut with the top panel. Lastly, I finished the card by adhering the menorah with foam tape.
Next up is another card I created with the Joy Stamp Set and but this time I also incorporated the fun Whimsical Christmas Stencil.

First, I ink blended over the Whimsical Christmas Stencil with distress oxides (Candied Apple, Mustard Seed, Lucky Clover) onto an 5.5″ x 5.5″ panel of white cardstock. Next, I stamped and heat embossed “JOY” in glittery embossing powder. I then diecut the “JOY” out with the coordinating dies.

Next, I stamped and white heat embossed the rest of my sentiment onto pink cardstock and then trimmed the sentiment down to a strip. I then diecut the “JOY” out of white craft foam and then glued it to the cardstock “JOY”. Next, I finished the card by adhering the panel onto the card base, then I adhered the “JOY” and the sentiment strip underneath.
And last but not least is this cozy card created with the Winter Borders Stamp Set and Season’s Greetings Script Die.

First, I stamped one of the border stamps repeatedly in Tea Dye Distress Oxide on A2 panel of white cardstock. I then watered colored the images in with distress ink. Next, I stamped some matching images from the Joy Stamp Set in Tea Dye Distress Oxide, then watercolored them, and diecut them out with the coordinating dies.

I then diecut the sentiment from Kraft cardstock several times and then adhered the diecuts together. Next, I diecut an oval out of vellum. I then adhered the sentiment and the diecuts to the oval. Next, I added a stitched border on the panel and then adhered the oval with the sentiment and images onto the panel.
And that’s it!!! I hope you enjoyed! Thank you so much for stopping by!
~Channin
Blog Hop:
Pretty Pink Posh blog
Kay Miller
Channin Pelletier <<<You are here>>>
Caly Person
Thi Lam
Sharna Waksmulski
Ardyth Percy- Robb
Vera Rhuhay
Melody Rupple
Alix Davis
Nicky Meek
Dana Kirby
Heather Hoffman
Yana Smakula
Supplies:

The stripes of color on JOY is so pretty.
I need to look again at the giant ‘Joy’ die….it’s really great!
Your Christmas cards are so festive and joyful!! I love your Hanukkah card, very beautiful!! Thank you for inspiring!!
Lovely cards Channin!
Great cards! Now I need that JOY die.❤
Channin, those are beyond adorable, each and every one of them!! We celebrate Christmas and Hannukah in our home and what you did with the menorah was so ingenious!! LOVE!!!
Every single card is stunning. I love the way the menorah “lights” up.
The Christmas colors look beautiful on the Joy card.
Your cards are so Joyful and bright!!
The colors on your cards are so bright and cheery.
I LOVE what you did with the JOY die! Great colors!
Beautiful cards!!
Love those beautiful holiday cards, especially the first two cards with JOY die
Wonderful array of holiday cards
So many wonderful projects. Thanks for sharing.
Clever way to use all the pieces of the colorful strips and the Joy die! Love both of those cards!
I love how you embellished it with all the little Christmas things.
I love your striped joy card, so creative!
Your colors in your three cards shout “JOY” 🙂 And I love the peaceful blue you chose for your Happy Hanukkah card. I’ll have to try that vellum tip on the last card..cool! Thanks for inspiring me 🙂
I love all of these awesome cards, Channin, especially that gorgeous rainbow Joy!!
Great cards, love your interactive card!
I love that big JOY die.
Great ideas and so many different versions. Every one is unique in its own way! Thanks.
Fantastic cards and awesome ideas!! I love them all! ❤
Thank you for so many beautiful cards to look at.
Oh my! I just love that Joy card. Definitely going to CASE that idea! Just beautiful!
Fantastic cards! Love love love everything… you are so creative! Great inspiration 💜
Wow, lots of pretty inspiration! I love all the ‘joy’ cards. Love that set. And the hanukkah card is brilliant!
What fabulous cards!! And your colors are so awesome!
Really amazing cards. I love the interactive candles on the menorah.
Such awesome cards! I love how you used up some scraps! (I am always saving them and then don’t know what to do with them–I finally organized them, though, so I could actually use this idea!) Thank you so much for sharing! 🙂
so pretty
The stripe JOY won me over…it really delivers a punch!
That seasons greetings die sure is a pretty font. Your JOY cards are great. I think that would be a wonderful way too use scraps and I love the addition of the glitter. Your Hannukah background is lovely.
That Joy stamp and die set is so very versatile.
A great set of cards; lovely!
Love these cards!
Amazing card ideas full of techniques, I love the way you used scraps and made 2 cards out of 1.
Your cards are all so beautiful!
Thanks for sharing your awesome cards. I love the Joy Die and how you cut out the different strips.
Your cards are beautifully different! I love the strips of color!
I LOVE your Christmas rainbow idea!
A beautiful set of cards, Channin! I love the various ways you have used the ‘JOY’ die cut and the wonderful stripe colours! Thanks so much for sharing!
Love the design and colours of you JOY cards … stunning!
You have been busy and made some lovely cards. Fun way with the card for Hanukka x
Love two-fers. The stripes are wonderful
as a base and as the die cut. Great
cards. thanks for sharing
txmlhl(at)yahoo(dot)com
Never thought to use Kraft cardstock for die cutting a sentiment. Very nice cards. Thanks for sharing
Beautiful cards! I am really loving the Joy stamps and dies!
Fantastic creations! Love that JOY stamp!
Love how the colors of the striped are bold on the edges and light in thes center. The new joy stamp and die set is a must have!
One more beautiful than the other. Clever Hanukkah slider card.
Loving this release!
What great cards! I love the slider card showing the lit candles! They are all great cards! What a great release!
I like your pretty and colorful card designs.
Beautiful cards! Love the size of the Joy die.
Such wonderful cards..
Very creative with the lighting candles.
Lovely holiday cards!
Gorgeous inspiration! The cards are so beautiful. My favourites are the first two and last. Love this release. It is fabulous!
Wow!! That’s a lot of cards!! They are all so pretty. I think my favorite is the Hanukkah card. It’s so clever-I love interactive cards!! Great job!!
Very nice cards! Those Hanukkah candles are so clever. Interesting colors on your cards too!
Gorgeous gorgeous cards! I especially love your stripey “JOY” card! Thanks for the inspiration!
What a lovely set of celebration cards!
What great colors you chose. Awesome.
Love how you created all of your cards, they are all beautiful. I especially love the interactive Hanukkah card! Thank you for sharing your creativity and art work.
These are fabulous! I especially love the striped JOY cards so awesome!
Your cards are gorgeous! I love the bold, glittery JOY sentiment against the striped background!
So many gorgeous cards! Love the colors.