Hello all! It’s release day over at Waffle Flower Crafts (yasssss!!) and what better way to celebrate than with a blog hop and giveaway!!
![]()
This is a big release and once again I have a bunch of cards to share so let drive right in shall we!!:)
First up is the Oversized Merry Combo Set and the Horizontal Strips Die!!! I had a lot of fun playing with these two products! I love playing with color and the Horizontal Strips Die allows me to quickly put together different color combos with my colored cardstock and the Oversized Merry Combo Set is so beautifully designed, modern and clean, I feel like it is impossible not to make anything but absolutely gorgeous cards with this set. Plus these products were perfect for a mass production and so I designed a colorful Christmas card which you could easily recreate a home with whatever colored cardstock you choose!
Mass Production Christmas Card Design
Watch below or on my YouTube channel.
First, I trimmed 6 sheets of colored cardstock down to 6 A2 panels (4.25″ x 5.5″). I then diecut each panel with the Horizontal Strips Die. Once all the panels were die cut I then adhered one color of each stripe onto a panel of white cardstock that was just slightly smaller than an A2 panel with liquid glue till I had 6 striped panels. I then diecut out of white cardstock and white craft foam 6 “Merry’s” and then adhered the two together. Next, I positioned the snowflakes and the rest of my sentiment from the Oversized Merry Stamp Set in my MISTI and then stamped and heat embossed each of the striped panels. Once all the panels were heat embossed I adhered them to an A2 top-folding cardbase turned on its side. Then I finished the cards by adhering the dimensional “Merry” to the front of each card.
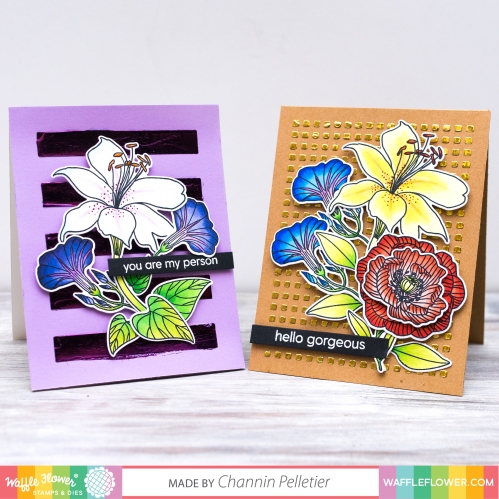
Next up is the beautiful Zinnia Combo Set illustrated by Karla Jodoin.

For my first card, I stamped several of the florals from the Zinnia Stamp Set in Antique Linen Distress Ink onto an A2 panel of Bristol paper. I then used my Tombow Dual Brush Pens (Medium Flower: 885, 062, 993, 933; Long Leaves: 126, 346; Zinnia: 665, 636, 062, 885, 993; Small Flowers: 755, 993; Small Leaves: 243, 228) to watercolor the images in. Once I finished coloring the flowers, I diecut them out with the matching dies.
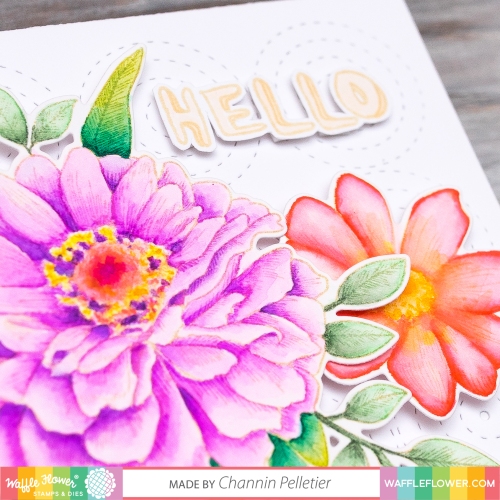
I then diecut an A2 panel of white cardstock out with the Circle Texture Die and then adhered it to an A2 top-folding card base turned on its side. Nest I stamped my sentiment in Antique Linen Distress Ink onto white cardstock, colored it in with copics (E50 & E21) and then fussy cut it out. I then attached my flowers and sentiment to my card front with foam tape.
For my next two cards with the Zinnia Combo Set, I wanted to share an idea for creating colorful flowers but with only little to no coloring. A full video on these cards will be live on Wednesday, July 17th.
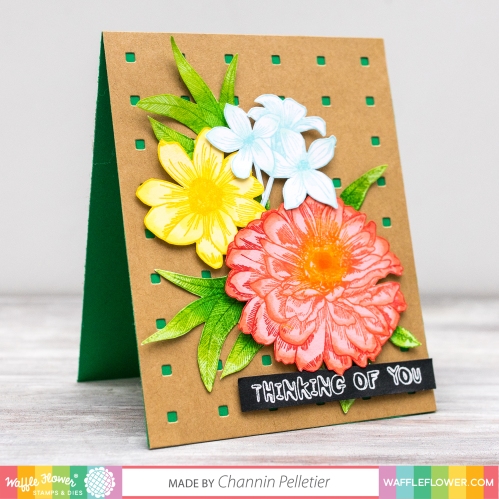
First, I stamped the Zinnia onto a light pink colored cardstock and used multi-inking and selective inking techniques to create a gradation on the petals and center with various Distress Inks (Mustard Seed, Carved Pumpkin, Ripe Persimmon, Abandoned Coral, & Festive Berries). I then stamped the Zinnia again but this time on light green cardstock in Twisted Citron and Mowed Lawn Distress Inks and only focusing on the leaves. Then stamped the medium flower in this set in Mustard Seed and Carved Pumpkin on light yellow cardstock and then the small grouping of flowers in Tumbled Glass onto white cardstock.
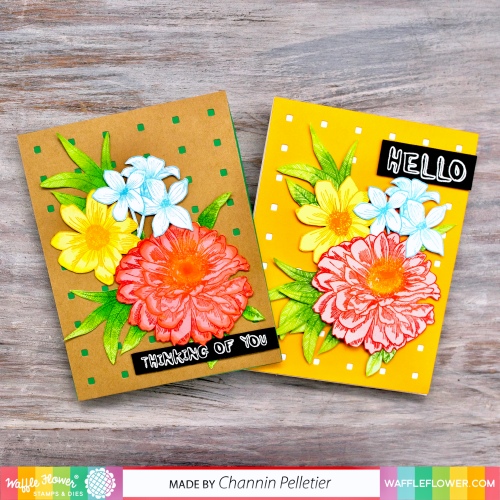
Once I finished stamping all the images I then just slightly colored them in with my copics to add some additional depth. Though I colored my flowers in for my first card (left) I chose not to for my second (right). I think both cards turned out great and I love how with this technique allows you to still get bright colorful florals whether you color or not!
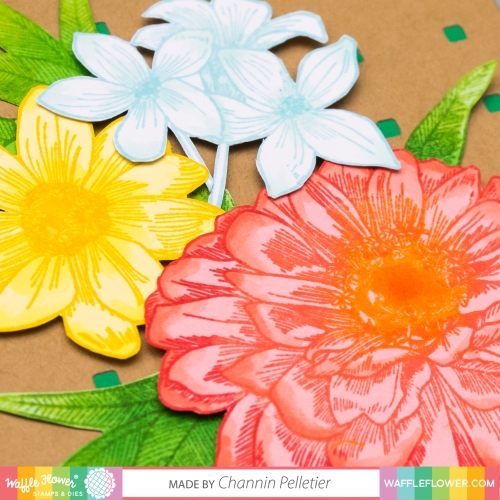

After I colored my images in I then fussy cut them out and then diecut an A2 panel of colored cardstock with the Micro Grid Panel 2 Die. I then adhered the panel onto a A2 top-folding card base and then adhered my flowers with foam tape. Lastly I finished the cards with a white heat embossed sentiment from the Zinnia Stamp Set stamped onto black cardstock.
The next set is the Bonjour Combo Set illustrated by Kamo. I couldn’t resist creating my own little Paris scene with these sweet images and the incredible Cloudscape Panel Die. I will also have a video on this card available on Saturday, July 13th.
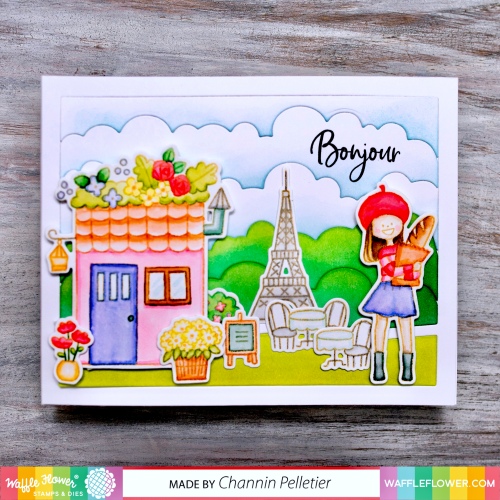
For this card I first stamped several images from the Bonjour Stamp Set in Antique Linen Distress Ink onto Bristol paper. Next, I watercolored the images in with Tombow Dual Brush Pens. Once I had finished coloring my images, I then diecut them out with the matching dies.
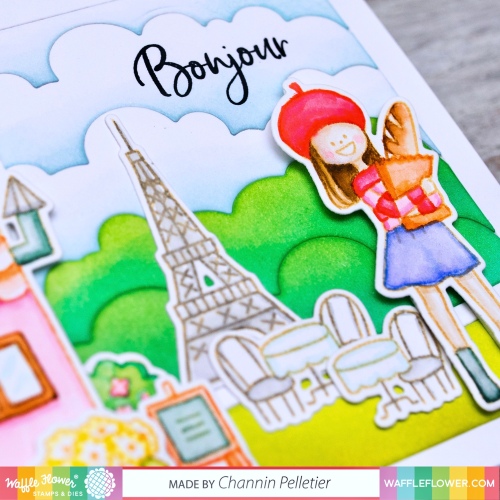
Next, I created my background. First, I diecut an A2 panel of white cardstock with the Cloudscape Panel Die. I then ink blending the different sections with distress ink. Some sections I ink blended to look like clouds other trees and shrubs. Once I had finished ink blending I then adhered the diecut panel and all its sections to an A2 top-folding card base. I then stamped my sentiment and then adhered all my images with either glue or foam tape.
The next set is the Fall Dreams Combo illustrated by Big Bear and Bird. Once again I decided to some no-line coloring with the charming set!
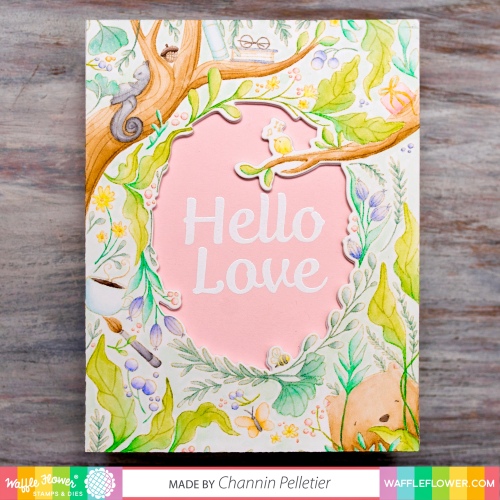
First, I stamped the image onto Bristol paper with Antique Linen Distress Ink. I then watercolored the images in with my Tombow Dual Brush Pens. Once I had finished watercoloring the images in, I then diecut the center out with the matching die.

Next, using the watercolored panel to help position the die, I then diecut the center of an A2 panel of white craft foam out with the same die. I then stamped and white heat embossed my sentiment, also from the Fall Dreams Stamp Set, on an A2 panel of pink cardstock. I then finished the card by adhering the pink panel onto an A2 top-folding card base and then adhering the craft foam and watercolored panel onto.
Next up is the beautiful Bouquet Builder 4 Combo illustrated by Oana Befort. I decided to combine these pretty flowers with the new full panel dies, Micro Grid Panel 1, Micro Grid Panel 2, and the Shutters Panel Die.
I love these full panel dies, they make gorgeous easy backgrounds but I decided to stretch them even further and use them to create my own stencils. The full video will be available Wednesday, July 10th.
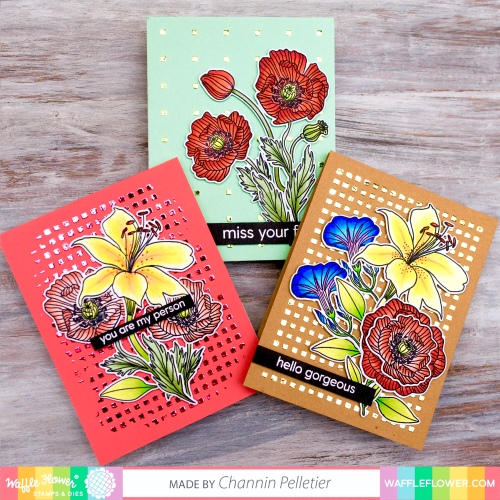
First, I created my own stencils by diecutting blank stencil sheets with the Shutters Panel and the Micro Grid Panel 1 and 2 dies. I then added Pixie Spray to the back of the stencil and then adhered it to an A2 panel of colored cardstock.
Next, I applied either Thermoweb Transfer Gel or Gina K.’s Glitz Glitter Gel over the stencil and then allowed it to dry. Once the transfer gel was dry I then used my laminator to foil over the panel.

I then stamped several images from the Bouquet Builder 4 Stamp Set in Memento Tuxedo Black, then copic colored them and then diecut them with the matching dies.

To finish the cards I adhered the panels onto my card base, then added the flowers with foam tape, and finished with a heat embossed sentiment from the Sisterhood Stamp Set.
The next set is the adorable Fun in Sun Combo Set illustrated by Liz Mytinger. Liz’s cute mice often inspire me to create interactive cards and the second I saw that surf board I knew exactly what I was going to make, a slider card! I will have a full video on this card live on Saturday, July 20th.

First, I created the beach background with the Cloudscape Panel Die. I diecut an A2 panel of white cardstock with the die and then I partially die cut another panel with the die to create my ocean. I then ink blended the first 3 sections of clouds with the Tumbled Glass Distress Ink, then the ocean with Salty Ocean and Chipped Sapphire, and lastly the sand with Antique Linen and Tea Dye.

After I finished ink blending the sand I then splattered it with water down Tea Dye to create the look of pebbles. With all my scenery layers done, I then cut off the small section that divided the ground and clouds then adhered the remaining frame, the ocean, sand and 3 ink blended cloud layers to an A2 panel of white cardstock. With my background complete, I then diecut a channel for my slider with the smallest die from the Sentiments Die Set.
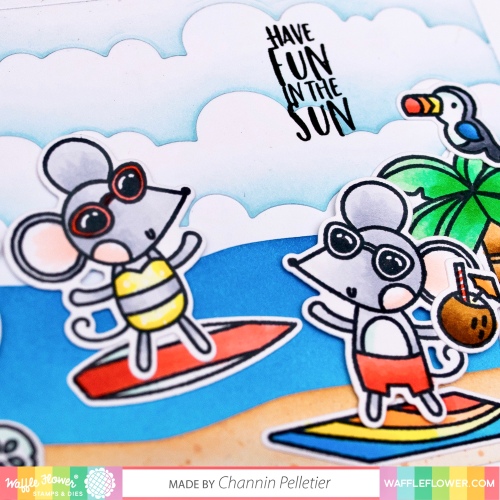
Next, I stamped my sentiment in Memento Tuxedo Black on the panel with my MISTI. I then added doubled up foam tape to the backside of the panel as well as on a doubled up small rectangle on the penny. Next, I adhered the panel to an A2 card base, making sure to sandwich the penny between the panel and the card base with the foam tape rectangle inside the channel. I then stamped and copic colored several images from the Fun in Sun Stamp Set then diecut them out with the matching die. I then finished the card by adhering the images to my card front with glue and foam tape.
And the last card for this release features the Favorite Hobby Stamp Set and the Vertical Stripes Die.
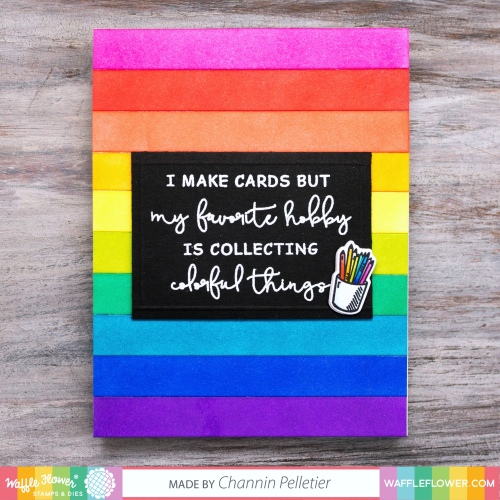
First, I diecut an A2 panel of white cardstock with the Vertical Stripes Die. I then ink blended each one of the stripes with a different Distress Inks (Picked Raspberry, Candied Apple, Abandoned Coral, Carved Pumpkin, Squeezed Lemonade, Twisted Citron, Cracked Pistachio, Salty Ocean, Blueprint Sketch, and Wilted Violet) and then adhered them to an A2 top-folding card base.

Next, I stamped the copic colored the colored pencils from the Favorite Hobby Stamp Set in Tuxedo Memento Black. I then diecut the pencils out with the matching dies as well as craft foam with the same die. I then glued the two together. Next, I stamped and white heat embossed a sentiment onto black cardstock. I then trimmed the cardstock down and added a scored border. I finished the card by adhering the sentiment then the colored pencils to the front of my card.
And that’s that!! 🙂 I hope you enjoyed, thank you so much for stopping by!
~Channin
Promotions:
To celebrate the blog hop, Waffle Flower is giving away $25 gift certificates to THREE lucky winners. You can leave a comment on this blog and along the hop by 11:59pm ET on 7/8/19 for your chances to win. Winners will be chosen at random from the comments left on any of the posts in this blog hop and will be announced on the Waffle Flower blog on 7/9/19.
Please find the hop list below:
Waffle Flower
Amy Rysavy
Jessica Frost-Ballas
Emily Midgett
Nichol Spohr
Channin Pelletier <<>>
Rebecca Keppel
Keeway Tsao
Alix Davis
Kelli Cool
JJ Bolton
Supplies:

OMGoodness! So many samples! I can tell that you enjoyed this release!
Wow lots of beautiful inspiration!
I love all your card, amazing coloring! Another great release by Waffle Flower!
Goodness! You have been hard at work! Gorgeous cards!
Your cards are absolutely gorgeous. Thanks for sharing.
You did an amazing job representing Waffle Flower with these cards. I especially love all things rainbow 😉
I LOVE THE TREE SCENE!!!!!!!!!!!!!!!!!!!!!!! I’m afraid that I will need to get that!
I enjoyed seeing each one of your cards, Channin! So nicely done and so many great ideas. Thanks for the inspiration.
Wow you have made so many gorgeous cards! Your coloring is beautiful.
You know and I know that these are all amazing cards created with great design skills and artistic ability. Love this whole array of beautiful creations. Congrats to Waffle Flower on this great release.
Absolutely stunning.
I love blog hops and Waffle Flower because they get me excited to create!
Wow, such a fabulous array of cards!
You are such an artist!
Fantabulous new products and projects!
WOW!!!! A SUPER COLLECTION of cards!!! I was SMITTEN with the Florals I saw in the sneak peak that was given….. I have NOT been disappointed! WOW!!!! I am working on a floral piece & the florals you came out with will work WONDERFULLY for it! GORGEOUS WORK, Channin!!!!!!!!!!!!! A FABULOUS RELEASE!!!!!!!! ;)<3
Waffle Flower always has the most unique products and fabulous designers to showcase them.
WHOA! What a cards galore! Fabulous designs and inspiration!
Whoa!! Love the cards,just adore your coloring.
Your blog post is so full of amazing ideas for this release, I may have to bundle and save!
What a great cards for the whole team! great inspiration
What a beautiful variety of cards! I love the non-traditional colors on your Christmas card!
Super colorful. Your cards have a great punch.
Wow! So many gorgeous cards! I love all your designs and these flowers are so stunning. Wonder job!
So many wonderful ideas! Thank you for sharing.
Wow! All your cards are wonderful….. and this is such a great Release!
I love all your beautiful, fun, colorful cards. This is such a wonderful release with some of the most gorgeous floral images I’ve ever seen. I particularly love the Zinnia — stunning.
Another fantastic release.
SO MUCH AWESOMENESS! I love the rainbow christmas cards and your coloring on the flowers and french set is amazing!
Wow, what fabulous colors!
All are very lovely. Gorgeous! Tyfs!
Great card ideas. TFS!
So many beautiful cards. I thought the zinnia were my favorite until I got to gow you used the background dies. Thanks for sharing
The flowers are amazing.
WOW. so many amazing and beautiful cards! LOVE the scenes you made with the mice and the Bon Jour sets, the non-traditional Christmas cards with the awesome oversized Merry and the Zinnia and Bouquet Builder 4 blooms are gorgeous!
Awesome cards! 🙂 Love all of the pretty flowers.
Great new release, I love what you’ve done with them, some really great cards!
Wowzers you are so talented!!! so many ideas!!!
Wow. Wonderful cards/ Thanks for the great design ideas. Love the sentiment on the last card.
So many great examples! Love your Merry card and how you colored the fall card, so sweet
BONJOUR combo is a new fave, so gorgeous and loving all the inspiration!!
This is such an amazing release. I absolutely love the floral cards.
You have made it irresistible!
Love how you used the Glitz Glitter gel with the micro panel! Thanks for the inspiration!
OMG you were busy making lots of pretty with this awesome release! Love the ‘bonjour’ card – that’s a fun set! The zinnia is just gorgeous. And I love how colorful your cards always seem to be. 🙂 Thanks for all the wonderful inspiration.
Fabulous cards & release!
stunning work – love the coloring
oh my, so many examples of what could be done…zinnia was my favorite
Love your cards. The flower is beautiful and the mice are sooooo cute! Thanks for sharing!
Wow…what beautiful cards…..so many samples. love the colors.
Wowww!! You are on a roll!! Each creation is super awesome! The floral ones are just gorgeous! ❤
Such a nice variety of lovely cards! The watercolored zinnia is gorgeous. I especially like the techniques of stamping on colored paper and using a background die to make a stencil.
Wow–you have been busy–pretty and colorful!
Such an eclectic set of cards. Love the
“french” scene. The flowers are gorgeous.
Wonderful collection. thanks for sharing
txmlhl(at)yahoo(dot)com
Absolutely gorgeous cards … I love how you have everything from the cute and whimsical to the bold and elegant. aNd you have a great eye for colour
So many awesome samples! The floral designs are gorgeous, and your coloring is awesome! Fabulous representation of the items in the release!
Wow! So many examples! All of your projects are fabulous! I especially like all of the florals. So beautiful!
Stunning! That fall stamp looks like so much fun!!!
Wow! What an
amazing bunch
of cards! All are
so pretty and love
all the different looks.
Carla from Utah
Too much temptation here! Love them all – your samples are so colorful and fun.
So many wonderfully, and gorgeous cards you’ve created and all from Waffle Flower who is having a super release.
Your coloring on all these amazing creations is true perfection! Love the bright cheery ones especially. The cute saying from Your Favorite Hobby set is wonderful & so true!!!
Wow!! So many wonderful cards!! Fall Dreams Combo is colored beautifully. Love that card and the first Zinnia. Gorgeous!!
Wow, so many wonderful projects. I love the colours and details.
Thanks for sharing so many amazing and fun cards. Loved your process video.
Wow!! Channin! Your cards are amazing! They are all so gorgeous with your clever designs and colour combos! I really can’t choose a favourite! Thanks so much for sharing and inspiring us.
Such a lovely set of cards!
Such a great variety of cards…that Zinnia is so beautiful!
Such beautiful colors.
Wow! These are all so incredible! Love your coloring and scenes! Plus the rainbow Christmas card is awesome!
Wow so many incredible cards, great job!