Hello friends! Today is Waffle Flower Craft’s February Release Blog Hop!! Yahoo! I’m so so excited about this release because very single product this month is just so SO pretty!
![]()
Once again I have plethora of cards to share with you so lets drive right in! 🙂
First up is the absolutely gorgeous Peony Dreams Combo Set illustrated by Oana Befort!

Isn’t this set just glorious!! I know I shouldn’t pick favorites but I think this is my most favorite set in this release! The flowers are so fun to color and the girls are so elegant and beautiful!

I created a video for this card so please check it out below or on my YouTube channel.
Copic Colored Peony Dreams
Of course could not stop at just one card with this dreamy set!

For my second card, I first stamped the images in VersaFine Onyx Black Ink onto Bristol paper. I then watercolored the images in using Tombow Dual Brush Pens. Next, die cut the images out with the matching dies.
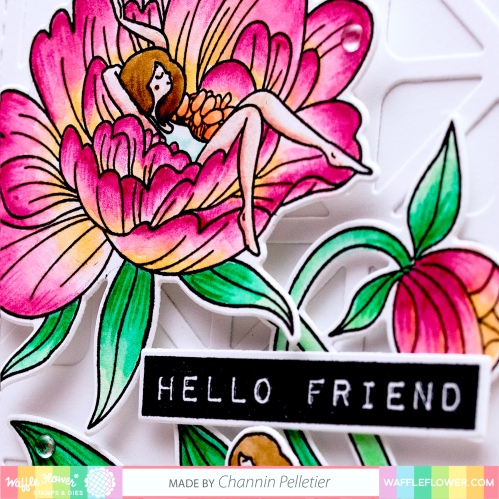
I created the background with the Tile Panel Die and adhered it to the front of an A2 top-folding card base made from 110lb white cardstock. I then added the colored images with foam tape and completed the card with a few clear enamel dots from WFC’s Clean & Clear pack.
Next set is the adorable Be Her Combo Set illustrated by Big Bear and Bird. This is such a darling set! The four critters are so sweet and all the accessories are so fun to play with!

I decided these images were perfect for Valentines so I created 4 using the Love Notes Die as the base. I stamped and copic colored all the critters and several accessories.

I then die cut them with the matching dies and added to the front of the love notes. I then die cut hearts out of colored cardstock and stamped a sentiment onto the larger hearts using the Favorite Valentine Combo Set.

I then adhered the large heart inside the note and several of the smaller hearts to the inside and outside of the note. I finished the Valentines by adding Stickles to the tiny the hearts and some of the images.
Next up is the darling Little Fairies Combo illustrated by Kamo. This set is seriously just too cute!

For my first card I stamped several images from the Little Fairies Stamp Set in VersaFine Onyx Black onto Bristol paper. I then watercolored the images with Distress Inks. Once colored I die cut the images out with the matching dies. I then die cut a dome using the A2 Nested Domes Die Set out of craft foam and white cardstock. I then adhered the foam and cardstock domed frame together and then ink blended a background on the dome negative with distress inks (Spiced Marmalade, Picked Raspberry, Mermaid Lagoon).
Next, I die cut grass using the Chunky Grass Die and then ink blended with Twisted Citron and Mowed Lawn Distress Ink. Next, I trimmed the grass to fit inside the dome and then stamped the sentiment and then constructed the dome. Next, I filled the scene with the colored images. I then die cut an A2 panel of white cardstock with the Diamond Texture Die and adhered it to an A2 top-folding card base. I then finished the card by adhering the dome and then adding sparkle with Stickles and iridescent sequins.
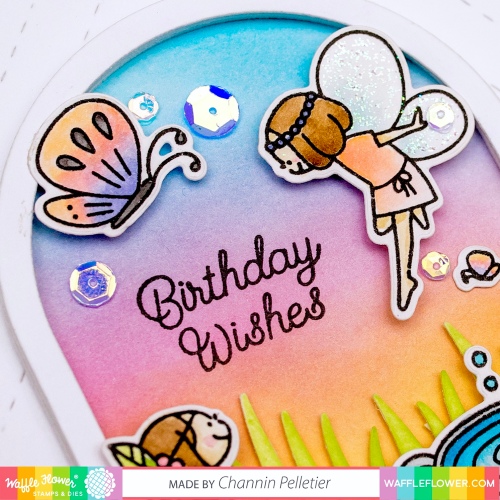
For my second project I decided to create a shaker card!

Just like before I stamped and watercolored the images from the Little Fairies Stamp Set with Distress Inks. I then ink blended a background with a rainbow of WFC inks. I then die cut the panel with the largest die from the Stitched Layers Die Set. I then used the same die to create a matching frame out of craft foam. I then adhered the cardstock frame to an A2 panel of acetate and then adhered that to the foam frame.

Next, I adhered the negative ink blended panel onto an A2 top-folding card base and then constructed a scene inside with my colored images and then stamped the sentiment. Next, I added some iridescent bubbles to the scene and then poured some chunky flower glitter onto the scene. I then finished the card by adhering the top of the shaker down.
For my third card (yes THIRD) I decided to create a spinner card.

I started by stamping and coloring the images in same manner I did for the previous two cards. I did do some mirrored stamping to create the other side of the fairy which I will have a video on in the near future. Once the images were all colored I die cut them with the matching dies. I then stamped a background onto a yellow panel with a small flower from the set in WFC’s You Said What dye ink.

After I stamped the panel I die cut it with a circle die from the Nesting Circles 2 Die and the largest die from the Nesting Rectangles 1 Die. I then used the panel to align the same circle die onto the front of an A2 top-folding card case then ran it through my die cutting machine. I then taped my string to the card front, then glued the stamped panel onto. Lastly I finished the card by adhering my fairy to the string and the rest of the images and some crystals to the card front.
Next is the stunning Be You Tiful Combo Set by Karla Jodoin.

For this card I stamped the images in Antique Linen Distress Ink onto Bristol paper. I then watercolored the images in with Tombow Dual Brush Pens. Once I had finished coloring I die cut the images with the matching dies.

I then die cut a coral panel with the Diamond Texture Die then adhered it to an A2 top-folding card. I then stamped and white heat embossed a sentiment onto black cardstock and then die cut with the matching dies. I then finished the card by adhering the images and sentiment with foam tape and embellishing with clear sequins.
Next up is the beautiful and versatile Diamond Texture Die and the Label Greetings Combo. I’m such a sucker for any panel die! They are just so useful, they can pretty much can work for every occasion, and they are a great accompaniment to many different techniques! And this first group of cards is a good example of that.

First, I die cut three A2 panels of Bristol paper with the Diamond Texture Die. I then loosely colored the diamond sections of the panels with a variety of Tombow Dual Brush Pens. Once the panels were colored I then spritzed the panel with water to activate the ink to get it moving and flowing.

I also used a small brush to help move the ink to completely cover the panels or mix more. I then let the panels dry. Once dry I adhered the panels onto a top-folding card base and then added a white heat embossed sentiment created with the Greeting Labels Combo Set.
These first cards are very technique focused but the simplicity of this second card really shows off the beauty of this die.

For this card I simply die cut a panel of silver mirrored cardstock with the Diamond Texture Die.

I then white heat embossed a sentiment with the Label Greetings Combo and colored cardstock. I finished the card with a couple clear crystals.
Last is the sweet Tiny Terrarium Stamp Set which is also illustrated by Big Bear and Bird.

For this card, I simply stamped the image and a sentiment in Memento Tuxedo Black onto an A2 panel of white cardstock. I then copic colored the image.

Once colored I trimmed the panel down and then adhered it onto a black card base.
And that’s a wrap! Phew!
Promotions:
To celebrate the blog hop, Waffle Flower is giving away $25 gift certificates to THREE lucky winners. You can leave comment on my blog and along the hop by 11:59pm ET on 2/7/19 for your chances to win. Winners will be chosen at random from the comments left on any of the posts on this blog hop and will be announced on the Waffle Flower blog on 2/11/19.
Blog Hop:
Channin Pelletier <<<You are here>>>
Thanks so much for stopping by!
~Channin

WOW! You have created some amazing cards. I really love the valentines with the little critters.
Oh my gosh, these are SO CUTE!!!!! I am loving how you colored the flowers and animals. NICE
So many really great images. I like your shading–you are quite the expert.
You are SO talented!
Oh wow!! So many gorgeous creations! The first card is just stunning!! Love all your work! 🙂
Oh my gosh!! I am astonished at your talent!! Your coloring is phenomenal!! The blues in the first card are stunning!! All of the cards are breath taking!! Thank you for sharing your talent with us!! 😍
Wow! You really got busy with all these great stamp sets! I love all of them but my favorites are the peonies! Thanks for all the great inspiration!
So many lovely projects! Fabulous!
Wow! You’ve been busy creating. Those peonies are gorgeous! I love the rich colors you used. I think my favorite new set is “Be Her”. Those critters are just precious!
So many adorable cards! It’s really hard to choose a favorite but I’m loving the Peony dreams set. Love your coloring on those! TFS!
wow, so cute, your designs are fabulous,
oh my!!!!! what an incredible collection of cards – love all the wonderful ideas and designs you have shared:)
So much amazing inspiration, I love every single card you created, awesome!
Love your cards! 🙂
I can’t even pick a favorite! There is so much amazingness here! It’s all wonderful!
Wow! You’ve been busy… I love every one of your cards and they are all Great! Now I want everything!
The tiny terrarium stamp is absolutely the cutest. So adorable, I gotta use it. Thanks for sharing!
The Peony Dreams is my favorite, the size is perfect for easy watercolored cards, and you don’t need much with this unique and beautiful images.
Sweet work, love every single little detail!
Wow! They are absolutely gorgeous. Thanks for sharing.
So much Awesomeness! Could you do any more?!?! GEEZ! Alll soooooooo cute! I love your coloring! Those critters are so cute!
Oh my goodness! So many wonderful projects! I dont know where to start! Each and every one a joy! I love the drama of the first with the peony! Absolutely stunning, and the valentines, and fairies are adorable! What a way to make me want them all!
Plethora of cards to share is right, wow! And what beautiful cards they are! Great new stamps and dies!
Great creations with this super cute release!
Beautiful colors on the Peony cards!
Oh my goodness! I love the Peony Dreams Combo set it is a MUST HAVE. I love your beautiful cards.
WOW! Talk about an array of incredible projects, infused with vibrant colour, awe-mazing creativity and abundant joy! I’m especially smitten with the Be Her critters (your Valentine cards are darling) and Label Greetings. May have to suspend my shopping hiatus and welcome these into my collection *grin*
~carol
Lots of beautiful cards. The florals with the little ladies is just precious and you did an amazing job with them. The little critters are really cute too. Thanks so much for sharing your art.
Aw wow super sweet cards!! Loving your vibrant colours!
What a wonderful assortment of cards! Great coloring!
Wonderful Cards!
So many beautiful cards! Your colouring is wonderful. I especially like the little Valentines notes with the Be Her set, and the Fairy cards!
So excited about all the new stamps and dies! Hard to single out my favorites since there are so many! Love your coloring of the Peony Dreams image, and the Little Fairies are just adorable!
Are you kidding me?!! You have so much eye candy here, I could drool for hours! They’re all wonderful, but the Peony dreams cards just stole my heart!!!
SQUEAL@ LOVING the NEW Products and ALL of your SWEET Cards!! WOWOWOWOWOW!! You’ve been BUSY!! THANKS SO MUCH for sharing and have a FABULOUS WEEK!!
What an effort to make all
these cards! They are cute
and fun and gorgeous. Love
them all.
Carla from Utah
It’s always a delight to come to your blog for the new releases, because of how in depth you go! You just have so many great ideas. I especially like your no-line coloring; it’s just gorgeous. Thanks for sharing all this creativity with us!
Woooow so many amazing creations!!! I cannot even choose a favourite! Love that you used different techniques!!
Super cute! Love them all!
Wonderful set of cards!!! As always your colouring is pretty amazing!!! ❤ ❤ ❤
WOW. absolutely filled with so much inspiration! Love your work!
LOVE what you created!
What an awesome post for the new goodies from Waffle flower! I love your Love Notes based Valentine! ADORABLE!
Wow! So much inspiration. Thank you for sharing. Your coloring is fantastic! I also love the valentines you made, and the label greetings projects. Thanks again.
Your cards are awesome! I love the valentines using the Love Note dies. I have added those to my list of things I want to purchase! Thanks for sharing you talents! Just amazing!
Love the ladies lolling around the flowers.
the dome over the rabbit is wonderful.
So many great projects. Thanks for
sharing txmlhl(at)yahoo(dot)com
WOW! You have been busy! Your projects are beautiful and vibrant and I especially love the Be You Tiful wreath on the coral panel. Stunning!
WOWZA, you totally rocked this release! SO many gorgeous and amazing projects, it’s a real feast for my eyes!
You made such wonderful cards! Thank you for the coloring tutorial- making sure to use the same color three times is a great idea! I love the cards with the vibrant backgrounds that you made with the Tombow pens! Very cool!
The critter Valentines are sooo cute!!! Peony Dreams is so imaginative and I love the color of the peony!! The Be YOU Tiful set is so versatile!! But my favorite of all is the darling, adorable little fairies!! Who could resist their darling little faces, ethereal wings and cute little feet?!!! Great job on all!!!
Wow!! Gorgeous cards!! I really love the cute little envelopes!!
WOW ! You had so much fun with all your amazing projects. Your colouring is excellent & you explain it so well in the video as to why & how. I’m in love with the Be Her Combo set, got to get this set on release day. Thank you so much for all the inspiration.
So many great projects! I am especially loving those cute little animal envelopes, and the no line colored wreath with the new cover. Great new release!
What a great selection of cards. Love the critters. Thank you
Oh my goodness! I love all your creations… so many cute things. The Peony Dreams is pretty fun!
I love all of your cards! I love the little valentines with the cute envelopes and the adorable images on them. The colored paper is perfect and love the idea of the putting the images on the outside.
Fabulous variety of projects. My fave is the Love Notes with the cute critters.
Wow you did an absolutely fabulous job with these new products. Love that first formal card and cute envelope.
Wow! These are incredible! And there’s so many! Love the girl in the blue flower, it just pops off the card!
Amazing cards! Your coloring is beautiful regardless of the medium. I love the blue peony flower and the spinning fairy is adorable!
Stunning depth of colors and inspiration!!! Love your flowers especially!
Wow – a lot of fun cards – love your bright colors!